
Wednesday, July 27, 2011
Just In Case You Thought I Was Color Blind...
I know I need to change my header. I also need to change the name of my blog when this little one arrives. So, hopefully in the next few days I will get that done! I have to find a header that will match my blog or create one and I honestly don't know if I have the patience to try and create one right now!
Knit Fabric Baby Headband
Knit Fabric Baby Headband
Supplies: 3" by 12" (for a 0-3 months)
A bow to attach 

Take your 3 by 12" fabric and fold it in half. Sew the two short raw ends together. I used about 1/4" seam or so.
 Here is what it looks like after being sewn.
Fold the knit over it self to cover the seam as shown in the pic. Sew down the middle of where you just folded the fabric down to cover up the raw seam.
Sew down the middle of where you just folded the fabric down to cover up the raw seam.
 Now you want to attach your bow. I attached a flower that I had made out of knit. I just sewed through the felt around the whole circle not catching the knit flower in it just the felt.
Here is what the inside of the headband looks like after attaching your flower or bow.

And here is the adorable headband w/ the knit fabric flower .

Tuesday, July 26, 2011
Knit fabric flower
Knit Fabric Flower Tutorial
Supplies:
12 knit circles about 2" (you will want to put them in 4 groups of 3)
1 felt circle about 1 1/2"
needle and thread (I used quilting thread because it is stronger)

Start by bringing your thread up the middle of the felt circle. Now you will grab one of the groups of circles and bring the needle through the center of them.
 Bring the needle back down through the circle of fabric and then bring it up and down again to make a small x in the middle of the knit circles.
 Now fold over the first group you have sewn on so that they won't be in the way while you sew the next group of circles on.
  Bring the needle up through the middle of the felt or close to it and the next group of knit circles. Do the same thing you do for the first group making a small x in the center.
 Now you want to fold the 2nd group over also and bring the needle up through the center of the felt again.
 Repeat making an x on this group of knit circles. You should now have 3 groups of circles on your felt circle.
 Move the 3rd group of knit circles out of the way so that you can sew on the last group of circles.
 Repeat what you did for the last 3 circles by going up the center of the felt and trying not to catch the other groups of knit circles while sewing this one on. Here is what it should look like after the 4th group of circles is sewn on. You might have to "fluff" it a little.
  The back of the flower will look like this. Tie of the thread by knotting it in the felt.
 Here is the finished flower!! These are super easy! You can also do 3 groups instead of 4 for a different look.
Now you will grab one of the groups of circles and bring the needle through the center of them.Bring the needle back down through the circle of fabric and then bring it up and down again to make a small x in the middle of the knit circles. Now fold over the first group you have sewn on so that they won't be in the way while you sew the next group of circles on. Bring the needle up through the middle of the felt or close to it and the next group of knit circles. Do the same thing you do for the first group making a small x in the center.Now you want to fold the 2nd group over also and bring the needle up through the center of the felt again.Repeat making an x on this group of knit circles. You should now have 3 groups of circles on your felt circle.Move the 3rd group of knit circles out of the way so that you can sew on the last group of circles.Repeat what you did for the last 3 circles by going up the center of the felt and trying not to catch the other groups of knit circles while sewing this one on. Here is what it should look like after the 4th group of circles is sewn on. You might have to "fluff" it a little.  The back of the flower will look like this. Tie of the thread by knotting it in the felt.Here is the finished flower!! These are super easy! You can also do 3 groups instead of 4 for a different look.
Sunday, July 24, 2011
38.5 weeks
Another week down! Hopefully baby boy decides he is ready to join his family soon! We are sooo ready to meet him!!

Chiffon Skirt Pics
My kiddos (esp. girls) can't just take a pic and smile. They always have to pose...I don't know where they got that from because frankly I like to hide from the camera usually! Here is Noel in her skirt that I made her. I also made her a necklace w/ chiffon rosettes. She looked so adorable!

Here is Noel in her skirt that I made her. I also made her a necklace w/ chiffon rosettes. She looked so adorable!

Chiffon Skirt Tutorial
Supplies:
3" chiffon (I used 3 different colors but, you could just use 1)
Old tshirt or 1/2 yard knit fabric
1" elastic (length depends on your child) I used 20"
The first thing I did was cut the shirt off under the armpits. I am going to use the bottom as is so that I don't have to hem it. I then held it up to my daughter knowing that it would be about 1 1/2 - 2" shorter. The length was perfect so I did not trim it anymore. It was probably about 18-20" long.
 The next thing I did was trim the sides to bring it in a little. I cut it into an A line type skirt. Just trim off both sides starting wider at the bottom and getting thinner towards the top. This will also help with too much bulk around the waist.
 I then serged up each side. You could also just use a sewing machine. Since it is knit it won't unravel.
 I then serged around the top of the skirt. (You can also skip this step)
 Here is what it should look like after serging/sewing.
 Now you will want to fold over the top of the skirt. I folded it over about 1 1/2". My elastic was 1" wide.
 Be sure to leave about a 2" opening. You will not put the elastic in now. It is easier to sew the cihffon on w/out the elastic in.
 Now you are going to prep your chiffon. I wanted a variance in blue on my skirt so what I did was double up the chiffon. My bottom 2 layers are going to be blue on top of black. You need to ruffle enough to go around the bottom of the skirt twice. **Easy ruffling tip: put your machine on the highest setting for stitch length and tension. It should just ruffle up on its own as shown below.
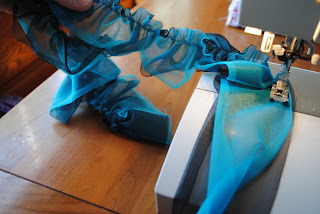 The next thing I did was blue on blue (no pic.) Then I did blue on top of white as shown below. Just make sure you ruffle enough of each color for two rows.
  SUGGESTION: You might want to pin the beginning of each row onto your skirt to make sure it is not going to end up in the middle of your waste band. You might have to overlap a little more if you are making a shorter skirt than the 1/2" that I did.
3" chiffon (I used 3 different colors but, you could just use 1)
Old tshirt or 1/2 yard knit fabric
1" elastic (length depends on your child) I used 20"
The first thing I did was cut the shirt off under the armpits. I am going to use the bottom as is so that I don't have to hem it. I then held it up to my daughter knowing that it would be about 1 1/2 - 2" shorter. The length was perfect so I did not trim it anymore. It was probably about 18-20" long.
The next thing I did was trim the sides to bring it in a little. I cut it into an A line type skirt. Just trim off both sides starting wider at the bottom and getting thinner towards the top. This will also help with too much bulk around the waist.I then serged up each side. You could also just use a sewing machine. Since it is knit it won't unravel.I then serged around the top of the skirt. (You can also skip this step) Here is what it should look like after serging/sewing.Now you will want to fold over the top of the skirt. I folded it over about 1 1/2". My elastic was 1" wide.Be sure to leave about a 2" opening. You will not put the elastic in now. It is easier to sew the cihffon on w/out the elastic in.Now you are going to prep your chiffon. I wanted a variance in blue on my skirt so what I did was double up the chiffon. My bottom 2 layers are going to be blue on top of black. You need to ruffle enough to go around the bottom of the skirt twice. **Easy ruffling tip: put your machine on the highest setting for stitch length and tension. It should just ruffle up on its own as shown below. The next thing I did was blue on blue (no pic.) Then I did blue on top of white as shown below. Just make sure you ruffle enough of each color for two rows. SUGGESTION: You might want to pin the beginning of each row onto your skirt to make sure it is not going to end up in the middle of your waste band. You might have to overlap a little more if you are making a shorter skirt than the 1/2" that I did.
Pin on the first layer to the bottom of the skirt. I let the chiffon hang over the bottom about 1/2". 

Then you will want to sew the chiffon in place. I used 1/2" seam allowance. When you get to the end of the row fold under the raw edge and finish sewing.
  (No pic of the next step) Pin the next row in place, which was another blue on black, and have it over lap about 1/2" over the row you just sewed on.
 When you get to the end of the row fold under the raw edge and finish sewing.
  (No pic of the next step) Pin the next row in place, which was another blue on black, and have it over lap about 1/2" over the row you just sewed on.
Next you will pin in place the blue on blue row doint the same as above overlapping 1/2". Don't look to closely...I didn't pin! Do that for the next 4 rows.
 Here is what it should look like when you get all the rows of chiffon on. A total of 6 rows and they ended right under the elastic band. If you have to cheat the last row down go ahead and do that you don't want to sew through the waistband area.
 Measure your child's waist and subtract 1" that is how long you will cut your elastic. Then you want to attach a large safety pin and slide it through the casing that you made earlier.
 Pull enough of the elastic out on both sides and overlap about an inch and sew it together.
  Not a pretty sew job but it works and it will be hidden!
 Pull the elastic back into the skirt and sew the opening closed.
 And here it is all finished. I will take a pic tomorrow morning of it on Noel. She slipped it on for a few minutes before bed and it looked adorable!
Here is what it should look like when you get all the rows of chiffon on. A total of 6 rows and they ended right under the elastic band. If you have to cheat the last row down go ahead and do that you don't want to sew through the waistband area.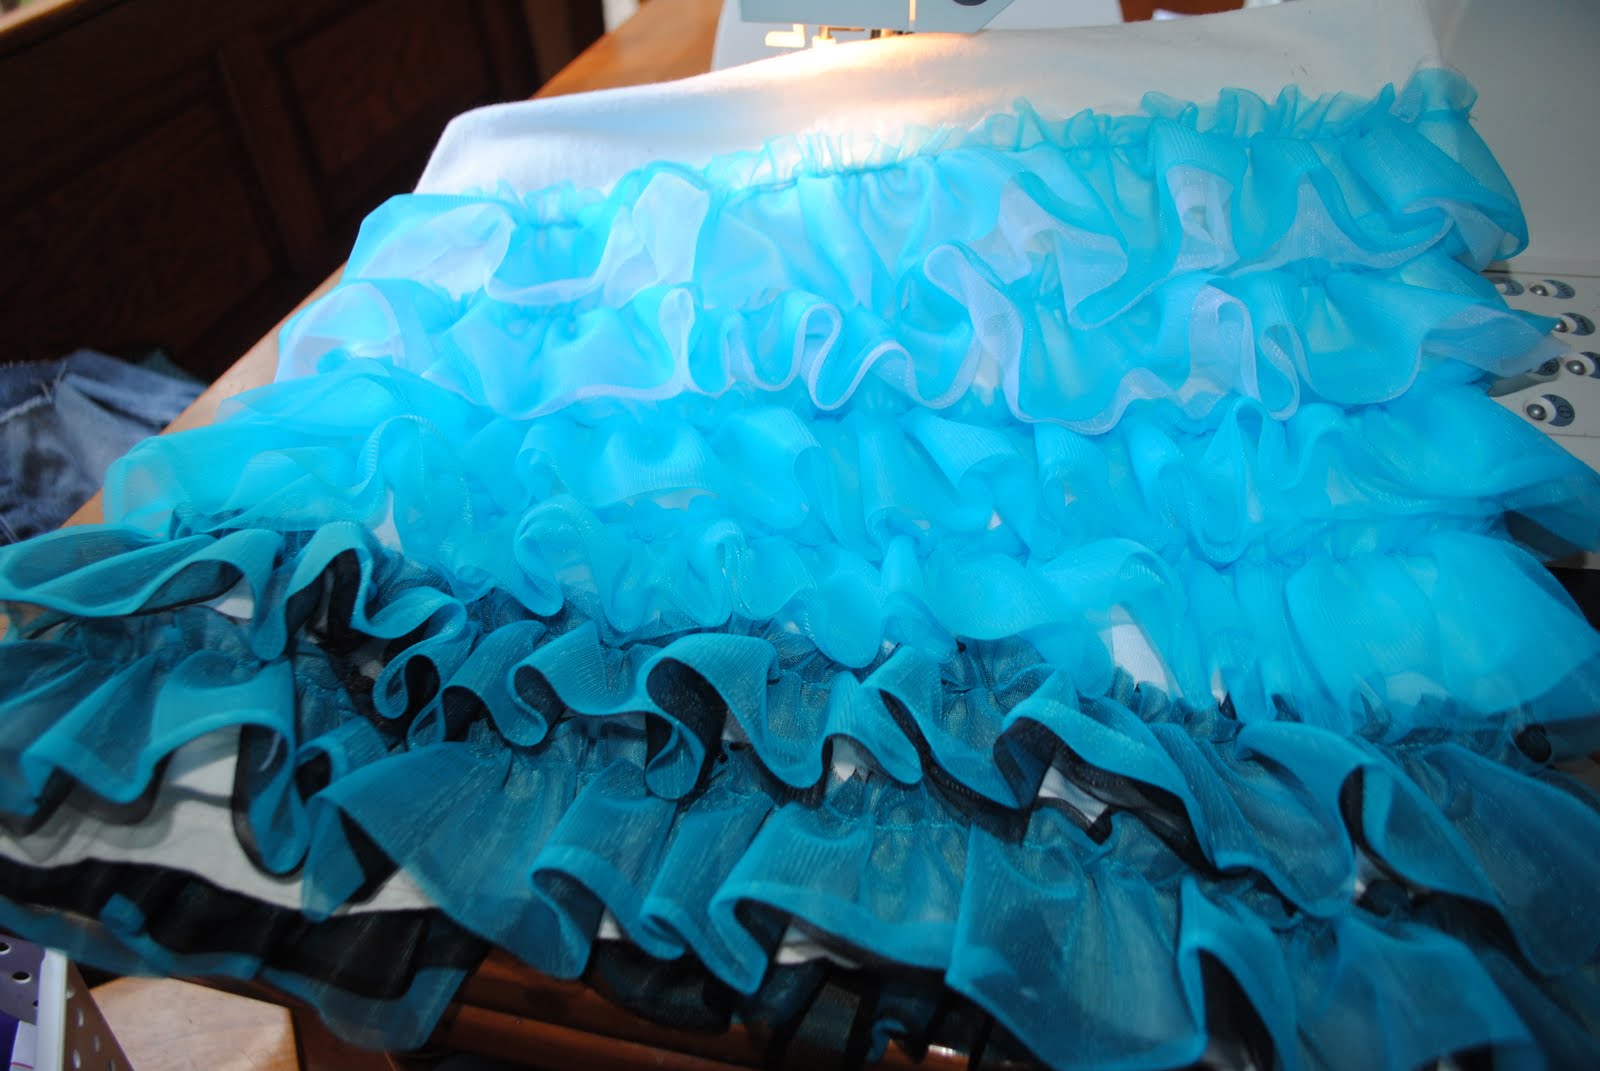 Measure your child's waist and subtract 1" that is how long you will cut your elastic. Then you want to attach a large safety pin and slide it through the casing that you made earlier.
 Pull enough of the elastic out on both sides and overlap about an inch and sew it together.
  Not a pretty sew job but it works and it will be hidden!
 Pull the elastic back into the skirt and sew the opening closed.
 And here it is all finished. I will take a pic tomorrow morning of it on Noel. She slipped it on for a few minutes before bed and it looked adorable!
Saturday, July 23, 2011
Under construction!!!
I am trying to change the look of my blog. Please be patient with me I struggle w/ anything having to do with the computer so it may take me a little while to get it how I want it.
Here is one of the things I worked on today!
I have been wanting to make a skirt w/ chiffon on it for a long time now. I ordered some last week and it came in yesterday so.....
 I like them but, I have some other ideas floating around in my head. I basically just made a "twirl" skirt and then added rows of ruffled chiffon. It took a lot more than I had intended though. Hopefully the 2 little girls that will receive these as bday gifts will feel super girly in them!
 Here is a pic of my Noel modeling one. It is a little big on her and she had her pjs on so nothing matches but, I hope you get the idea.

If the baby stays put a little longer then I will make another style of skirt w/ the chiffon that I have drawn up in my head...hopefully it will turn out as cute as it looks in my head. Unfortunately that doesn't always happen! :)
Friday, July 22, 2011
Anyone know how I can change my blog??
I am wanting to change the format of my blog so that there is a search tool and also I wanted to put stuff under categories up at the top. I am at a total loss of how to do this. If you know how to do it would you please help me out. Thanks!!!
Look what I got tonight!!!
I had a scentsy party tonight and a couple of my sweet friends gifted me w/ baby gifts. How FUN!! My Sis in law brought over a couple outfits for the babe...the camo is appropriate since her hubby my brother is currently overseas serving in the Army!! I will think of him every time Tyler wears the outfit!
 My dear friend Charlee brought over this awesome quilt that she made. It is amazing!! Quilting is one thing that I do not have the patience for...I love it!!!
 Thanks soo much ladies!!!
 My dear friend Charlee brought over this awesome quilt that she made. It is amazing!! Quilting is one thing that I do not have the patience for...I love it!!!
 Thanks soo much ladies!!!
Subscribe to:
Posts (Atom)