I totally made this pattern up so hopefully this tutorial is complete and you understand my instructions. Feel free to ask questions and I will answer them as quickly as possible. Can't wait to see what you all make.
Grab 'n Go Tutorial diaper and Wipe's Holder by yours truly!
Supply list:
velcro 2 fat quarters fusible fleece
bias tape or 2” by 36” of fabric 2 1/2” by 12” fabric for strap
ribbon, buttons, ric rac, etc... for trim
Supply list:
velcro 2 fat quarters fusible fleece
bias tape or 2” by 36” of fabric 2 1/2” by 12” fabric for strap
ribbon, buttons, ric rac, etc... for trim
Cut you 2 fabrics and fusible fleece 12 1/2” by 18 1/4”. Iron the fusible fleece to the fabric that will be showing when you are finished.

Place your two fabrics with right sides facing each other. Sew along one short end. Open out and fold with wrong sides together and iron.

Round out the two top corners. This will be the end that you did not sew together. I used a ribbon spool to draw around.


Place a 2” piece of velcro (the soft side) 1 1/2” down from the top and centered. Pin in place and sew.

Fold the bottom up six inches and then sew around all the raw edges. Use a very small seam allowance this will only be to keep all the fabric in place while sewing on the bias tape.

OK for the next part you are going to make your own bias tape (except it's not true bias tape unless you cut your fabric on the bias) Anyways, that's ok I cheat all the time by not cutting on the bias. You are going to do this for the strap and binding. Take your fabric and fold it in half length wise and iron.

Fold the bottom up six inches and then sew around all the raw edges. Use a very small seam allowance this will only be to keep all the fabric in place while sewing on the bias tape.

OK for the next part you are going to make your own bias tape (except it's not true bias tape unless you cut your fabric on the bias) Anyways, that's ok I cheat all the time by not cutting on the bias. You are going to do this for the strap and binding. Take your fabric and fold it in half length wise and iron.


Open out and then fold each side to the center and iron.

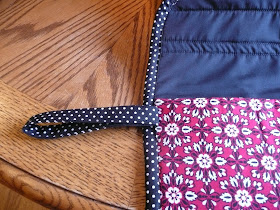
Fold strap in half and pin it to the side of your bag. Stitch strap in place.
You now need to put the other side of the velcro on the top of the bag. Make sure you don't sew it to close to the edge or it will be in the way of the bias tape.

If you are going to embellish your bag now would be the time to do it. Add ribbon, buttons, etc...

Now it's time to finish up. Pin the bias tape all the way around the bag and repeat how you started the bias tape at the beginning. Sew all around the bag making sure to catch the bias tape on both sides.
Next you are going to pull the strap out and sew it down so that it is facing the right direction.


Can i just pay you to make me one? hahahha.
ReplyDeleteYou are so uber talented. ugh.