Pages
Saturday, December 25, 2010
Merry Christmas!!.
I really do typically love this time of year! I love celebrating the birth of our Savior; especially singing the songs we this time of year about Jesus's birth; they just touch my soul! I hope you all have a very Merry Christmas and enjoy the time with your family!!
Thursday, December 9, 2010
My headboard.

An up close picture. I painted it white and then stained it to make it look nice and used!
 I looove my headboard!! I bought an old, beat up 5 panel door off of craigslist and with a little sweat and annoyance I was actually able to make a pretty cool headboard. I started off by sanding the door down to the bare wood and then I cut the end that was a bit longer to the same size as the other end. I painted it white, knocked the edges off by sanding, and then stained the heck out of it. I was a little nervous at first because it was soo white and then when I put the paint on it was a little darker than I was wanting but I stepped away for a bit came back and decided I liked the color that it was. This was a lot of fun and I really am happy with how it turned out!
Sunday, November 28, 2010
Too long!
Wednesday, November 10, 2010
Tuesday Tutorial
Wednesday, November 3, 2010
No Tuesday Tutorial this week but...
 Noel turned 4 yesterday!!! I can't believe 4 years have already past. She is such a fun little girl. Here is a little about Noel: She is pretty much always go, go, go. She loves playing with her big sister Grace and little brother Peter. She wears her cowgirl boots with pretty much everything and is just a hilarious girl. I feel so blessed to be able to raise this sweet little girl!
Tuesday, October 26, 2010
Tuesday Tutorial Apothecary Jars
Supplies (from the dollar store)
a 2 pack of sm. candle holders ($1)
2 lg. candle holders ($1 each)
3 glass containers ($1 each) They have a lot of different ones to choose from!
Craft glue or E6000
Take one of the large candle holders and put glue around the part where you put the candle in.
Take the small candle holder and place it on the large candle holder that you just put glue on. Hold it or place something heavy on it while it dries 5-10 minutes (really it was a little longer than that and if you are using E6000 it will be much longer than that)
Next put glue on the remaining small candle holder.
Flip one of the glass containers over and press the small candle holder that you just put glue on onto the bottom of the glass container.
Do the same thing with the remaining large candle holder and with the small and large candle holders that you already glued together.
Place something heavy on them while they dry.
Here they are all finished up on my pantry. I love them!!!
Wednesday, October 20, 2010
Maybe I should just call it Wednesday Tutorial....
Supplies:
small terrecotta pot and the drip pan thingy
A small round glass votive holder that would fit on top of your pot when it is flipped upside down.
Black spray paint
gorilla glue
Round wooden ball w/ one side flattened.
1. Spray paint pot and drip pan thingy black. It took several coats for my pot to get a nice even finish.
2. After everyting is dry place your pot upside down and glue the glass votive holder on w/ the opening on top of course.
3. Glue the round wooden ball the the drip pan thingy to make it look like a lid.
4. Fill jar w/ candy and put the lid on top of the jar. It should look like a bubble gum machine.
I will post pics. as soon as I take some!!
Wednesday, October 13, 2010
This week's Tuesday Tutorial on Wednesday!
OOPS!!!
**OK I have put up one tutorial and it is on October 8 because that is when I wrote it. So it is the post before this one!
Friday, October 8, 2010
SERIOUSLY!!!

I guess he was thirsty because he resorted to drinking out of that thingy that catches the overflow of water on the outside of the fridge. That's our boy always thinking outside the box! :)
On a side note that is the 90 minute shirt from MADE It was super easy and didn't even actually take 90 minutes. I have made like 4 of them now. Love them!!!

OOPS!! Tuesday Tutorial on Thursday! :)
I completely forgot to post my Tuesday Tutorial, so I am posting it today.
Supplies:
Sewing Machine ;)
Matching thread
Knee Socks
Scissors ;)
 Step 1: Cut your socks right above the heel; as shown in picture.
 Step 2: Take the unfinished edge of your sock and sew it on the very edge with a zigzag stitch that is REALLY close together (like you would sew an applique). I played around with how big I wanted my zigzag and ended up doing a 4.0 on my machine for the width. You can practice on the foot part that you cut off. As you sew it you want to stretch the sock in front of and back of the needle. This is what is going to give you a girly ruffled edge. Sew like this all the way around and you are finished!!

And here is my little model showing off her new funky "baby legs...for arms". If you can think of a catchy name let me know. **Yes, they are different than the ones I was sewing. They came in a two pack and the other ones weren't handy.
Monday, October 4, 2010
Fall Cleaning
Tuesday, September 28, 2010
Tuesday Tutorial Card Holder


 Also, rub off the expiration date on the side of the lid.
 Shove the brad in one lid and then line up the other lid and push the brad through that one to.
Fold down the tabs on the brad and viola you are done!! Well almost; put some cards in and play!!


Tuesday, September 21, 2010
Tuesday Tutorials!
Supplies:
3 different types of fabric
Drop Waist (top of skirt; this is where the elastic will go) 6" x "38
Top Layer 13" x width of fabric (times 2)
Bottom Layer 15" x width of fabric (times 2)
Ribbon Holder (scrap of fabric) 3 1/4" x 15 1/2"
3/8" ribbon 15" (times 2)
1" elastic
I will explain how to adjust these measurements to fit someone other than a size 6. O.K. so lets start out by figuring out the length of the skirt that you would like it to be. Decide how long you want the skirt and take your drop waist measurement (mine is 6") and your bottom layer measurement (mine is 15") add them together (mine is 21") and then subtract out 3" for seam allowances and the elastic casing (mine is 19").
 Take the drop waist layer and sew the sides together. You should have one continuous loop now.
 Next sew the two pieces of top layer fabric together at the sides (right sides facing together).
 Now sew the two pieces of the bottom layer fabric together at the sides. (again right sides facing together)
 Fold bottom edge up about 1/8" and iron. Fold up again about 1/4" and iron.
 Sew in place close to ironed edge.
 Do the same thing for the top layer fabric.
Take your drop waist fabric and iron down the top about a 1/4".

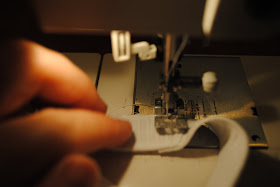
 Sew around elastic casing close to the ironed edge leaving about a 2" opening (so that you can slide the elastic in later).
 Pins are just there to show you my opening.
 Iron the ribbon holder fabric in half length wise and then open up and iron each side towards the middle so that they are meeting in the middle.
 It should look like this.

 Then sew down the other side and
 then the middle.
 Hook a safety pin to your ribbon.
 Thread one piece of ribbon up one side and then the other piece of ribbon up the other side. I measured my ribbon about six inches longer than the top tier; just long enough to tie a bow.
 Here is what it looks like coming out the other end.
 Once you get both pieces of the ribbon in and sticking out the other end pin them in place and sew across to tack them in place.
 This is what is should look like at this point.
 Slide the bottom layer inside the top layer with the right side of the bottom layer facing the wrong side of the top layer.
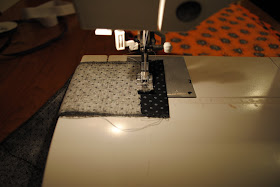
 Stitch these two layers together with your longest stitch; so that they can be gathered.
 I suggest doing two rows of stitching for the gathering (both at your longest stitch length.)
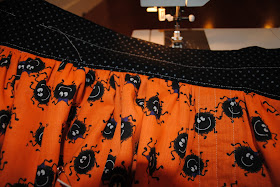
 Now comes the fun part!! Gathering!! Gathering!! Gathering!! You will want to pin the drop waist to the layers that were just sewn together with the gathering stitch and start gathering. I gather halfway around and pin and then do the other half.
 This is what it looks like all gathered up.
 Sew the attached layers together.
 This is what the skirt should look like now.
 I like to top stitch; so go ahead if you would like and stitch on the drop waist about an 1/8" from the seam.
 Measure out your elastic 1" less than the waist measurement of the person you are making this skirt for and cut it. Hook a safety pin into the end of it and thread it through the top tier casing for the elastic.


