Just wanted to wish everyone a Merry Christmas!! It has been a busy, hectic month for our family. I am going to try and make a strategy plan for next year so that I can be more organized for Christmas and be able to enjoy it more than I did this year; granted there have been circumstances out of my control that have made the past couple months harder than they normally would have been. I will blog more about my plan later (maybe some of you can give me some suggestions).
I really do typically love this time of year! I love celebrating the birth of our Savior; especially singing the songs we this time of year about Jesus's birth; they just touch my soul! I hope you all have a very Merry Christmas and enjoy the time with your family!!

Saturday, December 25, 2010
Thursday, December 9, 2010
My headboard.
I have not had a headboard for a loooooong time and I had this idea floating around in my head that I wanted to turn an old door into a headboard. So, this is what I came up with...

An up close picture. I painted it white and then stained it to make it look nice and used!
 I looove my headboard!! I bought an old, beat up 5 panel door off of craigslist and with a little sweat and annoyance I was actually able to make a pretty cool headboard. I started off by sanding the door down to the bare wood and then I cut the end that was a bit longer to the same size as the other end. I painted it white, knocked the edges off by sanding, and then stained the heck out of it. I was a little nervous at first because it was soo white and then when I put the paint on it was a little darker than I was wanting but I stepped away for a bit came back and decided I liked the color that it was. This was a lot of fun and I really am happy with how it turned out!
Sunday, November 28, 2010
Too long!
O.K. it's been way too long since I posted. Life has been crazy busy. We had a wonderful Thanksgiving with LOTS of family. It was a total of 29 people and 15 of them were kids. It was chaotic but it really was a lot of fun. I have been trying to get all my Christmas decor. up, but for some reason it is taking me forever!!! I usually have it all up by the 2nd week of November, so I am a little behind. I will take some pics. when I am all done. I have a few favorites mainly my stockings, but I put up new garland on my stairs rails and I LOVE it!! Anyways, hopefully I can post a few crafts in the next couple weeks, but we'll see I am scheduled to get my brace put on this Wednesday (really exciting, I know!!) and then both my boys have birthdays at the beginning of December. O.K. enough randomness.
Wednesday, November 10, 2010
Tuesday Tutorial
I am hopefully going to post how I made my new headboard this week. I was exposed to poison ivy a week and a half ago and am completely miserable. So, I haven't really had the energy to do extra stuff. But I did finish up my headboard last week and I really love it. I used an old 5 panel door that required lots of sanding, scraping, and painting! Of course, if you know me I couldn't just paint it white and leave it be. I had to make it look old. I can't wait to share.
Wednesday, November 3, 2010
No Tuesday Tutorial this week but...
 Noel turned 4 yesterday!!! I can't believe 4 years have already past. She is such a fun little girl. Here is a little about Noel: She is pretty much always go, go, go. She loves playing with her big sister Grace and little brother Peter. She wears her cowgirl boots with pretty much everything and is just a hilarious girl. I feel so blessed to be able to raise this sweet little girl!
Tuesday, October 26, 2010
Tuesday Tutorial Apothecary Jars
Apothecary Jars!!!! I have wanted some of these forever! So, I figured out a way to make my own.
Supplies (from the dollar store)
a 2 pack of sm. candle holders ($1)
2 lg. candle holders ($1 each)
3 glass containers ($1 each) They have a lot of different ones to choose from!
Craft glue or E6000
Supplies (from the dollar store)
a 2 pack of sm. candle holders ($1)
2 lg. candle holders ($1 each)
3 glass containers ($1 each) They have a lot of different ones to choose from!
Craft glue or E6000

Take one of the large candle holders and put glue around the part where you put the candle in.

Take the small candle holder and place it on the large candle holder that you just put glue on. Hold it or place something heavy on it while it dries 5-10 minutes (really it was a little longer than that and if you are using E6000 it will be much longer than that)

Next put glue on the remaining small candle holder.
Flip one of the glass containers over and press the small candle holder that you just put glue on onto the bottom of the glass container.
Do the same thing with the remaining large candle holder and with the small and large candle holders that you already glued together.
Place something heavy on them while they dry.

Here they are all finished up on my pantry. I love them!!! 
Wednesday, October 20, 2010
Maybe I should just call it Wednesday Tutorial....
But that doesn't sound as catchy. I actually don't have any pics for my tutorial yet. But I am going to try and explain it.
Supplies:
small terrecotta pot and the drip pan thingy
A small round glass votive holder that would fit on top of your pot when it is flipped upside down.
Black spray paint
gorilla glue
Round wooden ball w/ one side flattened.
1. Spray paint pot and drip pan thingy black. It took several coats for my pot to get a nice even finish.
2. After everyting is dry place your pot upside down and glue the glass votive holder on w/ the opening on top of course.
3. Glue the round wooden ball the the drip pan thingy to make it look like a lid.
4. Fill jar w/ candy and put the lid on top of the jar. It should look like a bubble gum machine.
I will post pics. as soon as I take some!!
Wednesday, October 13, 2010
This week's Tuesday Tutorial on Wednesday!
So, I am going to be a total slacker and instead of writing my own tutorial for this I am going to link it to Raising Olives rain gutter bookshelves. I haven't actually made mine yet but this is exactly what I am going to do. I will put pics up as soon as I put up my shelves. I am going to put 3 in my girls room, 2 in the boys room, and 3 in the upstairs hall. I am excited to see how they work out!
OOPS!!!
Two Tuesdays have come and gone and I forgot to post my Tuesday Tutorials. I have one for sure that I will be posting later today and hopefully I will get the other one posted before we leave for St. Louis. Sorry, if you were waiting to see what I would come up with next. The creative juices haven't been flowing so freely with all this fall cleaning going on around my house!!! :)
**OK I have put up one tutorial and it is on October 8 because that is when I wrote it. So it is the post before this one!
**OK I have put up one tutorial and it is on October 8 because that is when I wrote it. So it is the post before this one!
Friday, October 8, 2010
SERIOUSLY!!!
I came into the kitchen and this is what I saw....

I guess he was thirsty because he resorted to drinking out of that thingy that catches the overflow of water on the outside of the fridge. That's our boy always thinking outside the box! :)
On a side note that is the 90 minute shirt from MADE It was super easy and didn't even actually take 90 minutes. I have made like 4 of them now. Love them!!!
OOPS!! Tuesday Tutorial on Thursday! :)
Ruffled Baby legs...for arms!!!
I completely forgot to post my Tuesday Tutorial, so I am posting it today.
Supplies:
Sewing Machine ;)
Matching thread
Knee Socks
Scissors ;)
 Step 1: Cut your socks right above the heel; as shown in picture.
 Step 2: Take the unfinished edge of your sock and sew it on the very edge with a zigzag stitch that is REALLY close together (like you would sew an applique). I played around with how big I wanted my zigzag and ended up doing a 4.0 on my machine for the width. You can practice on the foot part that you cut off. As you sew it you want to stretch the sock in front of and back of the needle. This is what is going to give you a girly ruffled edge. Sew like this all the way around and you are finished!!

I completely forgot to post my Tuesday Tutorial, so I am posting it today.
Supplies:
Sewing Machine ;)
Matching thread
Knee Socks
Scissors ;)
Step 1: Cut your socks right above the heel; as shown in picture.Step 2: Take the unfinished edge of your sock and sew it on the very edge with a zigzag stitch that is REALLY close together (like you would sew an applique). I played around with how big I wanted my zigzag and ended up doing a 4.0 on my machine for the width. You can practice on the foot part that you cut off. As you sew it you want to stretch the sock in front of and back of the needle. This is what is going to give you a girly ruffled edge. Sew like this all the way around and you are finished!! And here is my little model showing off her new funky "baby legs...for arms". If you can think of a catchy name let me know. **Yes, they are different than the ones I was sewing. They came in a two pack and the other ones weren't handy.

Monday, October 4, 2010
Fall Cleaning
I am in the process of getting my home ready for the winter season; which I am super excited for. I love snow! Hopefully we will be blessed with lots and lots of it. So here is my huge list of things I want to get done over the next month. I started about a week ago and have made a small dent in it...but have a loooong way to go. I am enlisting my kiddos help and they are actualy being cheerful about it too. So here it is...kinda, couldn't figure out how to upload a document to the post, but I put a link to it on my sidebar under "Fall Cleaning". :) Maybe I will figure out how to post it the right way but I have already spent 20 minutes trying to figure it out and I am just getting annoyed at this point.
Tuesday, September 28, 2010
Tuesday Tutorial Card Holder
I saw this on someones blog, of course I can't remember where. If I find it I will link it. Anyways, I made up my own little tutorial for this. It is super simple. 

 Also, rub off the expiration date on the side of the lid.

 Shove the brad in one lid and then line up the other lid and push the brad through that one to.
Fold down the tabs on the brad and viola you are done!! Well almost; put some cards in and play!!


Supply List:
2 Yogurt and/or Sour cream lid (or some sort of lid like this)
brad
Something to poke a small hole with
Goo gone
Washcloth or paper towel
Some cards to play!
Take the goo gone and put it on the lid where the printing is and rub off the design; you may have to do this a couple times. (do this to both lids)
Also, rub off the expiration date on the side of the lid. Poke a hole in the center of both lids.
Shove the brad in one lid and then line up the other lid and push the brad through that one to.Fold down the tabs on the brad and viola you are done!! Well almost; put some cards in and play!!
My girls looooove these. We play go fish alot right now because my little girls are trying to learn their numbers.
Tuesday, September 21, 2010
Tuesday Tutorials!
WARNING: This tutorial is seriously long. I hope it makes sense and if not PLEASE email me with any questions.
Supplies:
3 different types of fabric
Drop Waist (top of skirt; this is where the elastic will go) 6" x "38
Top Layer 13" x width of fabric (times 2)
Bottom Layer 15" x width of fabric (times 2)
Ribbon Holder (scrap of fabric) 3 1/4" x 15 1/2"
3/8" ribbon 15" (times 2)
1" elastic
I will explain how to adjust these measurements to fit someone other than a size 6. O.K. so lets start out by figuring out the length of the skirt that you would like it to be. Decide how long you want the skirt and take your drop waist measurement (mine is 6") and your bottom layer measurement (mine is 15") add them together (mine is 21") and then subtract out 3" for seam allowances and the elastic casing (mine is 19").
 Take the drop waist layer and sew the sides together. You should have one continuous loop now.
 Next sew the two pieces of top layer fabric together at the sides (right sides facing together).
 Now sew the two pieces of the bottom layer fabric together at the sides. (again right sides facing together)
 Fold bottom edge up about 1/8" and iron. Fold up again about 1/4" and iron.
 Sew in place close to ironed edge.
 Do the same thing for the top layer fabric.

Take your drop waist fabric and iron down the top about a 1/4".

 Sew around elastic casing close to the ironed edge leaving about a 2" opening (so that you can slide the elastic in later).
 Pins are just there to show you my opening.

Supplies:
3 different types of fabric
Drop Waist (top of skirt; this is where the elastic will go) 6" x "38
Top Layer 13" x width of fabric (times 2)
Bottom Layer 15" x width of fabric (times 2)
Ribbon Holder (scrap of fabric) 3 1/4" x 15 1/2"
3/8" ribbon 15" (times 2)
1" elastic
I will explain how to adjust these measurements to fit someone other than a size 6. O.K. so lets start out by figuring out the length of the skirt that you would like it to be. Decide how long you want the skirt and take your drop waist measurement (mine is 6") and your bottom layer measurement (mine is 15") add them together (mine is 21") and then subtract out 3" for seam allowances and the elastic casing (mine is 19").
 Take the drop waist layer and sew the sides together. You should have one continuous loop now.
 Next sew the two pieces of top layer fabric together at the sides (right sides facing together).
 Now sew the two pieces of the bottom layer fabric together at the sides. (again right sides facing together)
 Fold bottom edge up about 1/8" and iron. Fold up again about 1/4" and iron.
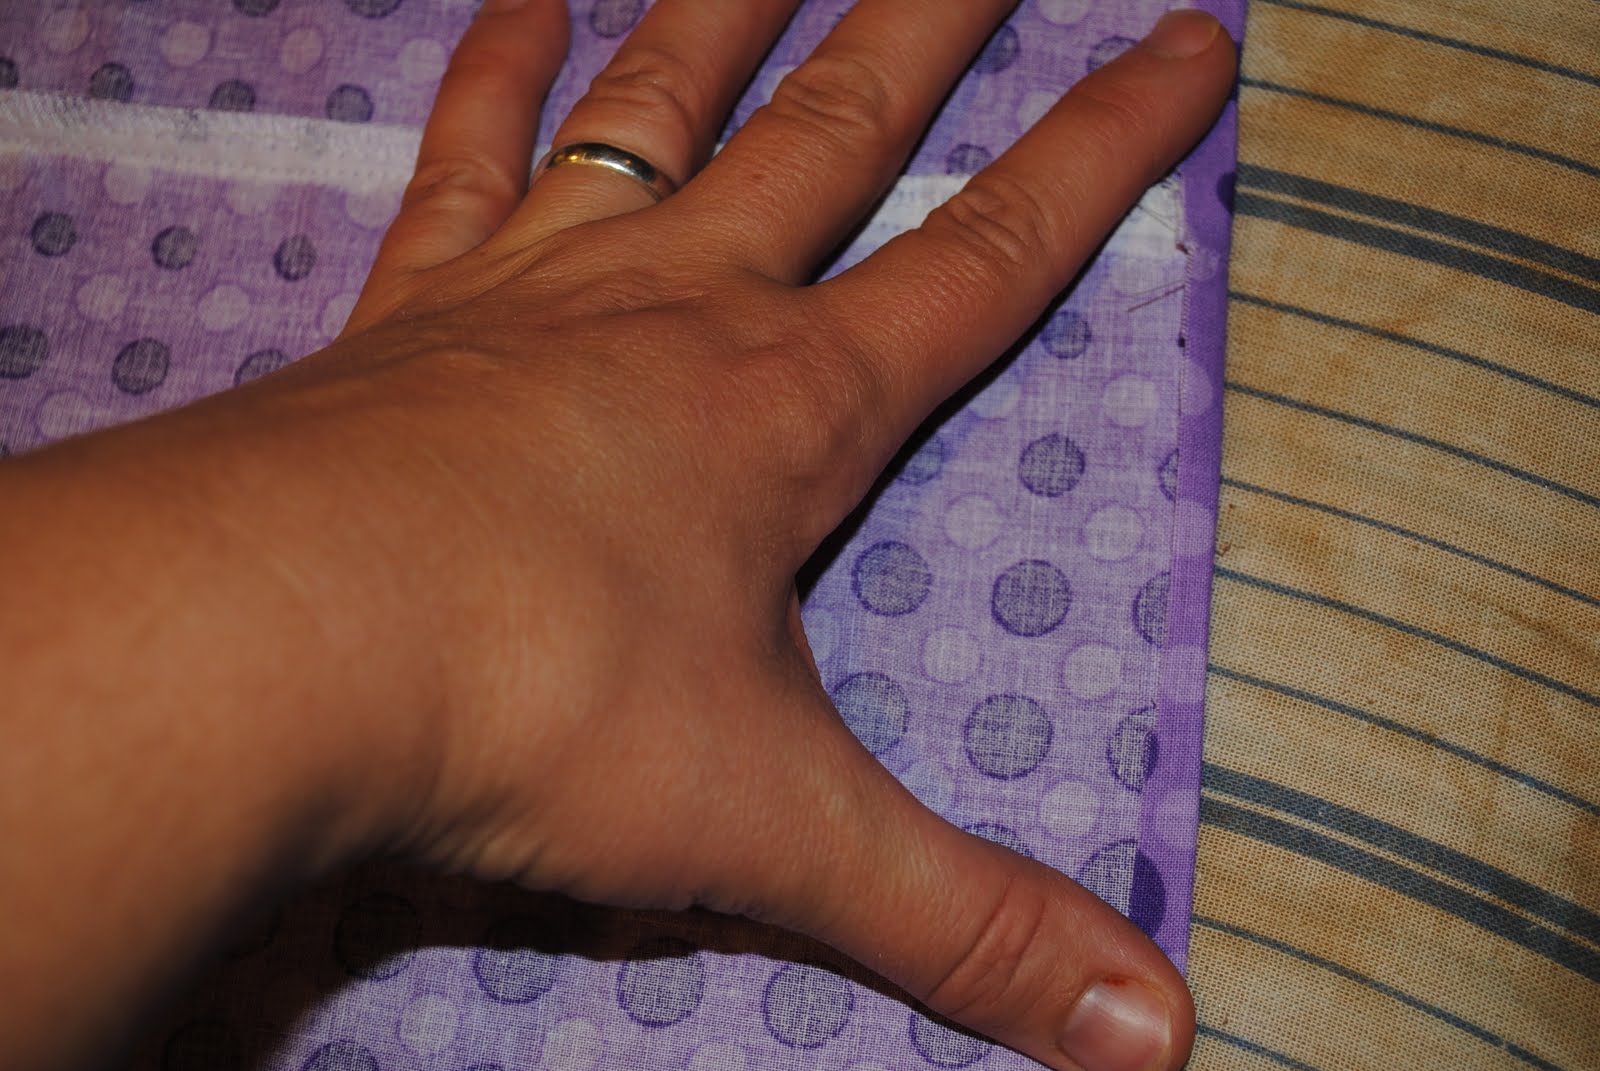 Sew in place close to ironed edge.
 Do the same thing for the top layer fabric.
Take your drop waist fabric and iron down the top about a 1/4".
Then Iron down about 1 1/8" for the elastic casing.
Sew around elastic casing close to the ironed edge leaving about a 2" opening (so that you can slide the elastic in later). Pins are just there to show you my opening.
Next take your ribbon holder fabric and fold up the bottom and sew in place.
 Iron the ribbon holder fabric in half length wise and then open up and iron each side towards the middle so that they are meeting in the middle.
 It should look like this.

 Iron the ribbon holder fabric in half length wise and then open up and iron each side towards the middle so that they are meeting in the middle.
 It should look like this.
I measured 12" in from the side and placed my fabric for ribbon gathering there.

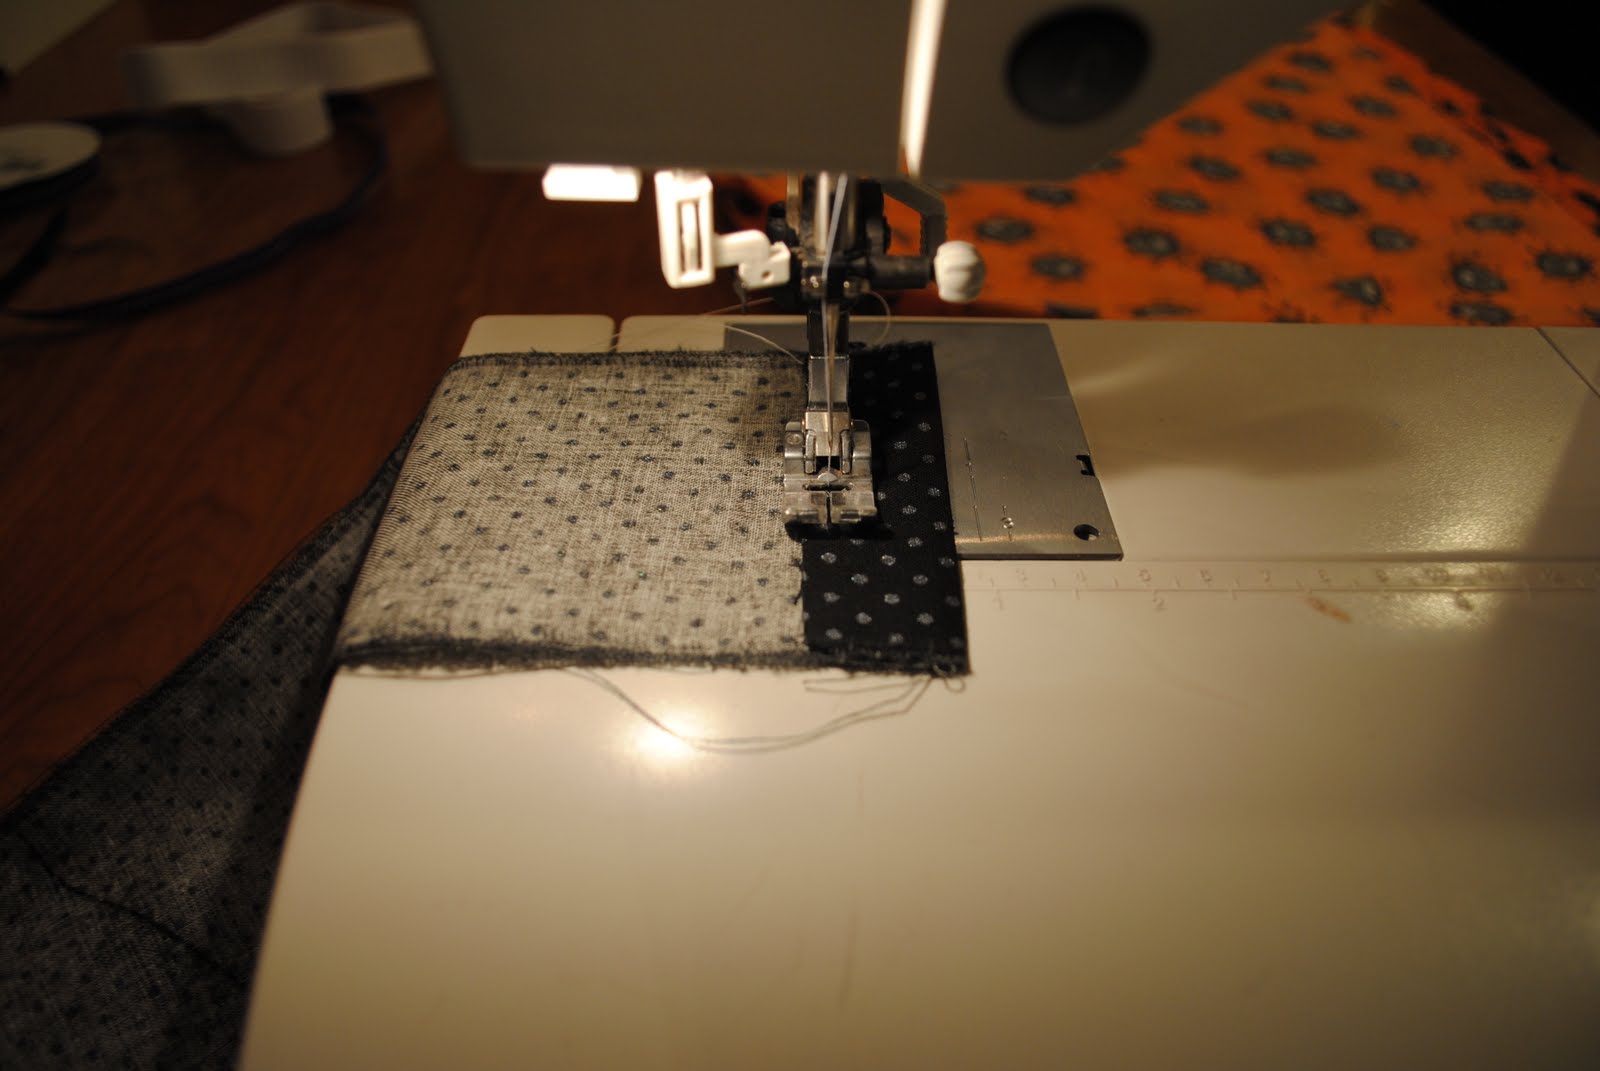
 Then sew down the other side and
 then the middle.
 Hook a safety pin to your ribbon.
 Thread one piece of ribbon up one side and then the other piece of ribbon up the other side. I measured my ribbon about six inches longer than the top tier; just long enough to tie a bow.
 Here is what it looks like coming out the other end.
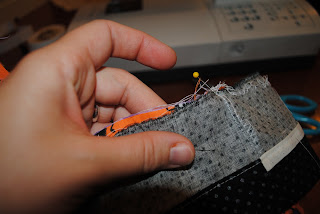
 Once you get both pieces of the ribbon in and sticking out the other end pin them in place and sew across to tack them in place.
 This is what is should look like at this point.
 Slide the bottom layer inside the top layer with the right side of the bottom layer facing the wrong side of the top layer.
 Stitch these two layers together with your longest stitch; so that they can be gathered.
 I suggest doing two rows of stitching for the gathering (both at your longest stitch length.)
 Now comes the fun part!! Gathering!! Gathering!! Gathering!! You will want to pin the drop waist to the layers that were just sewn together with the gathering stitch and start gathering. I gather halfway around and pin and then do the other half.
 This is what it looks like all gathered up.

 Sew the attached layers together.
 This is what the skirt should look like now.
 I like to top stitch; so go ahead if you would like and stitch on the drop waist about an 1/8" from the seam.

 Measure out your elastic 1" less than the waist measurement of the person you are making this skirt for and cut it. Hook a safety pin into the end of it and thread it through the top tier casing for the elastic.
 This is what it will look like when the elastic is completely threaded through.
 Overlap your elastic about an inch and sew together.

 After you sew the elastic together pull it into the casing and sew the opening on the casing shut.
 This is what you should have now.
 Now take the ribbons and push the fabric up and tie them in a pretty bow.
 TA-DA!!!! You are finished. I am sure this is about as clear as mud. As always please feel free to email me with questions!!


Pin your ribbon holder in place (or not) and sew down one side, leaving both ends open.
 Then sew down the other side and
 then the middle.
 Hook a safety pin to your ribbon.
 Thread one piece of ribbon up one side and then the other piece of ribbon up the other side. I measured my ribbon about six inches longer than the top tier; just long enough to tie a bow.
 Here is what it looks like coming out the other end.
 Once you get both pieces of the ribbon in and sticking out the other end pin them in place and sew across to tack them in place.
 This is what is should look like at this point.
 Slide the bottom layer inside the top layer with the right side of the bottom layer facing the wrong side of the top layer.
 Stitch these two layers together with your longest stitch; so that they can be gathered.
 I suggest doing two rows of stitching for the gathering (both at your longest stitch length.)
 Now comes the fun part!! Gathering!! Gathering!! Gathering!! You will want to pin the drop waist to the layers that were just sewn together with the gathering stitch and start gathering. I gather halfway around and pin and then do the other half.
 This is what it looks like all gathered up.
 Sew the attached layers together.
 This is what the skirt should look like now.
 I like to top stitch; so go ahead if you would like and stitch on the drop waist about an 1/8" from the seam.
 Measure out your elastic 1" less than the waist measurement of the person you are making this skirt for and cut it. Hook a safety pin into the end of it and thread it through the top tier casing for the elastic.
 This is what it will look like when the elastic is completely threaded through.
 Overlap your elastic about an inch and sew together.
 After you sew the elastic together pull it into the casing and sew the opening on the casing shut.
 This is what you should have now.
 Now take the ribbons and push the fabric up and tie them in a pretty bow.
 TA-DA!!!! You are finished. I am sure this is about as clear as mud. As always please feel free to email me with questions!!


Subscribe to:
Posts (Atom)