 My girls wanted to be in the picture too. Don't you just love their cheesy grins almost?!
 My girls wanted to be in the picture too. Don't you just love their cheesy grins almost?!
 You are going to take your fabric and fold it in half length wise.
 Then fold it in half again.
 And again. Now you are going to iron the heck out of it so that you have creases where it is folded.
 This is what it should look like after you have ironed it.
 I serged the edge of my strips of fabric and then attached them all together to make one long strip. Once you have done that you are going to want to put your sewing machine on its longest stitch and put your tension setting on the highest it will go. Then sew down the middle of the strip until it is all ruffled. (it should ruffle itself by doing those 2 things to your machine)
 Here is what it looks like as it starts to ruffle itself.
 The lines I had you iron into your curtain are for ruffle placement. I placed my ruffles on there to see if I had enough to do every line I had ironed onto the curtain. Obviously, I didn't cut it to try this out I just swagged it back and forth. I didn't have enough so I decided to do a pattern of 3 lines then skip 1. Start pinning your ruffles down, when you get to the end of a line cut the ruffle and start on the next line. This part took a little while.
 This is what mine looked like all pinned up.
 Now you want to sew them down. I sewed down the middle right next to the ruffling stitch. After I sewed down the middle I did pull out the ruffling stitch which was no biggie because it is such a large stitch.
 You want to iron the top and bottom of the curtain down by 1/2" each. Do not turn them down again because we are going to do the sides first.
 Iron down the sides of the curtain 1/2". Do this on both sides of the curtain.
  Then, repeat the last step and iron down the edge again by 5/8"-3/4". You should have a nice edge now. Do this on both sides of the curtain.
 Sew about a 5/8" from the edge on both sides of the curtain. Make sure you keep your ruffles flat as you sew them.
  Next you will iron the bottom up 5/8".
 Sew about 5/8" from the bottom of the curtain.
 Measure down about 2" maybe a smidge more. This will be the "sleeve" for the curtain rod.
 I sewed about a 2" seam here so that the curtain rod would fit through the opening.
 Here is the before picture of my bathroom w/out any curtains, but it did have broken blinds and a roman shade (which is a total piece).
 Here is my beautiful curtain. I love it, I wish you could see it in person it is much lovelier in person than in a pic. That is partly because it is such a small area for me to try and get a good pic. Oh well, you get the idea.
 This is what it looks like all trimmed up. You will also want to have your fabric strips that are 2 1/2" by 140".
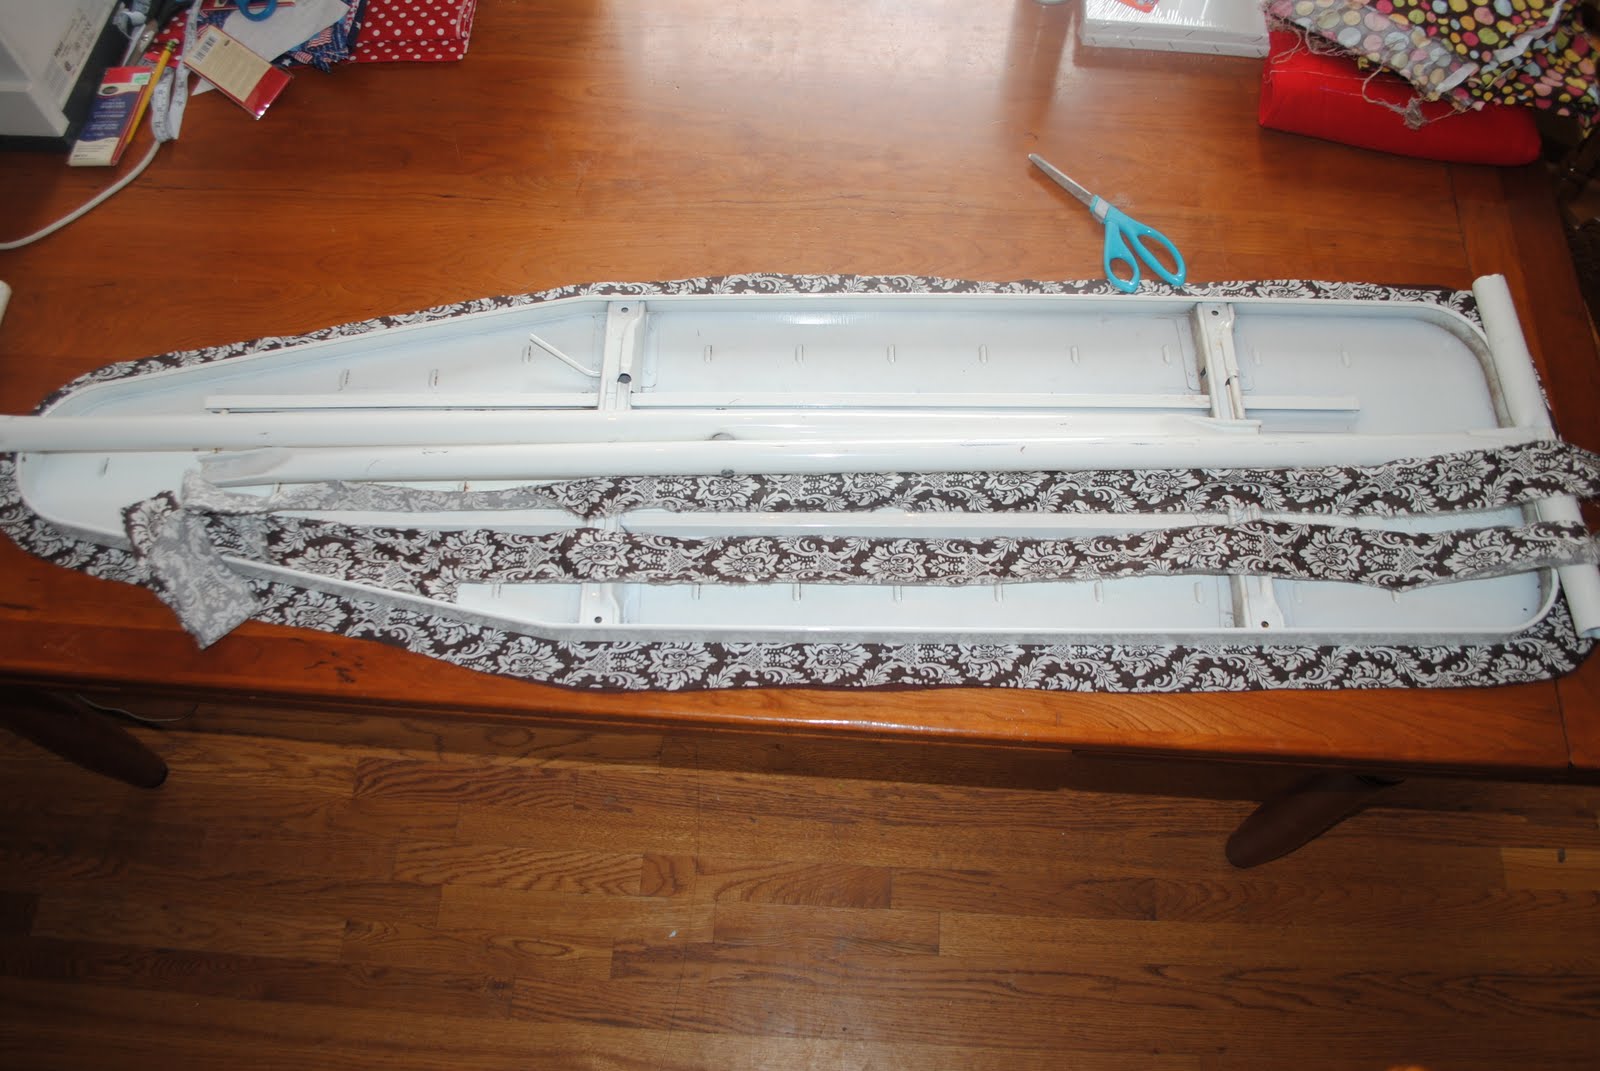 I used quilting batting to give it a little extra padding. You will want to cut that the same as the fabric.
 Once you have cut the batting place it in between the 2 layers of fabric.
 Sew around the edges of the fabric just to baste everything together.
 This is what it looks like all quilted.
 Iron the end under for the opening of what will become your tube for the string. You won't iron the other end under because it is probably going to be to long and you can trim it after you get it all pinned to the size it will need to be.
 Iron the 2 1/2" x 140" fabric in half lengthwise. This will become your tube to feed the string through to make the cover fit your ironing board.
 Pin the "tube" all the way around the cover.
 This is where I trimmed the fabric to fit it was about 10" to long so just cut it then fold the end under as you will see in the next picture and you will end up having two openings.
 Use a 1/2" seam all the way around.
  You are going to want to "feed" string or ribbon in the opening of the tube.
 Tie a knot in the string and slide the safety pin through the knot.
 Feed the string that is attached to the safety pin through the tube that you sewed onto the cover.
 String all fed through! It took a little while for me to get it all the way around that sucker.
 Place the cover upside down and put the ironing board on top of it. You will now want to pull the string tight, very tight. I had to pull my up around the edge of the ironing board and then just pulled the string until I couldn't.
 Tie it in a bow and the hard part is done now.

 I know cheesy smile but, in my defense I was smiling and talking at the same time trying to get him to stop goofing off!
 Also, I am finally in my 3rd Trimester!!!! WOOHOO!!!
 Supplies:
 Iron your fusible fleece onto the fabric that you are going to be using on the outside of the Key fob.
  If you are going to embroider or embellish your fabric w/ anything now is the time to do it.
 Put your 2 pieces of fabric right sides together. Use a 5/8" seam as pictured below.
 Open up the fabric and put wrong sides together. Now you are going to sew about 1/8" from the edge of the fabric. This is personal preference you can go closer or further. This is going to help the fabric lay down so that it isn't annoying the snot out of you while working w/ the other side.
  Now I topstitch about another 1/8" or so from the last line, like I said this is just personal preference you don't even need to do 2 rows of topstitching.
 This is what it should look like after both rows of topstitching are done on the one side.
 Now you are going to fold over the raw edges on the other side 1/2". I pin down the top layer just to hold it in place. Then I fold over the bottom layer 1/2" and pin them together. Hopefully, you will understand what I am saying by using the pics.

 Now you are going to sew about 1/8" from the edge and do another row of topstitching just like you did on the other side.
 This is what it should look like minus the wonky edge that I didn't sew so well apparently. Ughhh....my Pfaff is acting up and I am using a 99 dollar brother from wally world and I just don't have as much control w/ it as my Pfaff.
 Here is a pic. of the key fob hardware. Like I said I order my from etsy and it ends up being about 40 cents per set.
 Fold the fabric in half and then you are going to place the unfinished upper edge into the key fob hardware that has the clamp like part.
 Clamp down on the key fob hardware using pliers or something like that. Make sure you put a towel in between your tool and the hardware or it will leave marks on it.
 Here it is all finished.