Monday, July 27, 2009

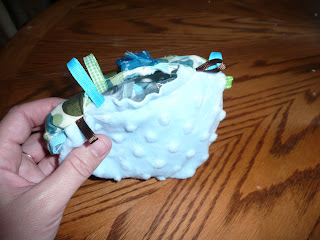
Taggies Tutorial

Taggies Tutorial
Supplies:
10" square of cotton fabric
11" square of minky or any super soft fabric
11" square of anything crinkly such as baby wipes packaging, twizzlers package (anything that will make lots of crinkly noises)
ribbon and ric rac scraps cut in 2-4" lengths

Cut your cotton fabric into a 10" square. Cut your minky into an 11" square and your crinkly stuff into an 11" square.
Sew your wrapper to the minky as pictured above. I use a longer stitch than normal; also make sure you sew with the minky underneath so that it is the part touching the machine.
You will now want to applique on your cotton fabric if you are going to. I cheated and used my embroidery machine to embroider a name on mine.

Take your cut ribbon and ric rac and pin it to your cotton fabric.


Baste your ribbon onto the fabric.


Now you want to pin the cotton fabric with the ribbon attached to the minky fabric with right sides together.


Sew these together with the crinkly stuff on the bottom; trust me it is just easier to sew this way. Leave an opening to turn it right side out.


Turn right side out and pin the opening.


Sew the opening closed and continue around the whole taggies with about a 1/4" seam.
At this point I ironed mine and almost ruined it because I had my iron on a very hot setting and it was starting to melt my twizzler packaging that was inside; so make sure your iron is not too hot if you are going to iron it.
That's it you have a super cute gift or toy for your baby!
As always feel free to ask questions!! :)

Sunday, July 26, 2009

My cute little bat baby!

My kids went to wally world with me and begged for me to buy batman pjs for our little man.....

Saturday, July 25, 2009

My next tutorial.

This is going to be my next tutorial! It is super easy (except for sewing on the minky; but even that is not too bad)
.

My school room/dining room makeover!! :)

OK so here are the before pictures (well kinda before) I had already started mudding when I remembered to snap a pic.

And here are the after pics. I absolutely LOOOOOVE my new school room!!!! It still needs the curtains and a few accessories, but I want to keep it simple! I'll post more pics when everything
is how I want it.

Not my typical post.

I usually don't post things like this but when one of my girlfriends emailed this to me I had to share it. I just thought it was to funny.

Mermaid or a Whale
Recently, in large French city, a poster featuring a young,thin and tan woman appeared in the window of a gym. It said: THIS SUMMER DO YOU WANT TO BE A MERMAID OR A WHALE?¨
A middle aged woman, whose physical characteristics did not match those of the woman on the poster, responded publicly to the question posed by the gym.
To Whom It May Concern:Whales are always surrounded by friends (dolphins, sea lions, curious humans).. They have an active sex life, they get pregnant and have adorable baby whales. They have a wonderful time with dolphins stuffing themselves with shrimp. They play and swim in the seas, seeing wonderful places like Patagonia, the Barren Sea and the coral reefs of Polynesia. Whales are wonderful singers and have even recorded CDs. They are incredible
creatures and virtually have no predators other than humans. They are loved,protected and admired by almost everyone in the world. Mermaids don’t exist. If they did exist, they would be lining up outside the offices of Argentinean psychoanalysts due to identity crisis.Fish or human? They don’t have a sex life because they kill men who get close to them not to mention how could they have sex? Therefore they don’t have kids either. Not to mention who wants to get close to a girl who smells like a fish store? The choice is perfectly clear to me; I want to be a whale.

P.S. We are in an age when media puts into our heads the idea that only skinny people are beautiful, but I prefer to enjoy an ice cream with my kids, a good dinner with a man who makes me shiver and a piece of chocolate with my friends. With time we gain weight because we accumulate so much information and wisdom in our heads that when there is no more room it
distributes out to the rest of our bodies. So we aren't heavy, we are enormously cultured, educated and happy.
Beginning today, when I look at my butt in the mirror I will think, ¨Good gosh,look how smart I am…¨

Friday, July 24, 2009

So tired.

I can't believe how tired I am! I was up until about 3am last night painting my school room/dining room. It looks amazing, I absolutely am in love with the colors. I did sailboat blue on the top half and chocolate brown on the bottom half and painted all the trim white. I think it has a very calming effect. Can't wait to get the ceiling done and move everything back in. I can't decide what to do for the curtains though. I have tan ones that have been hanging in there the past couple years and I was thinking about just revamping them but my creative juices just aren't flowing we'll see hopefully I will come up with something. Hopefully I will be awake enough later to post some pics of my new room!! :)

Wednesday, July 22, 2009

I could go crazy!

I am in the process of remodeling our dining/school room and let me tell you I feel like I could lose my mind. Trying to mud (which I totally stink at), scrape the ceiling and keeping the mess contained to that one room is enough to make anyone go mad but throw in my 6 kids constantly saying: MOM I NEED THIS, MOM THE BABY IS CRYING (that one really gets me because I'm thinking do you think I am deaf), MOM I'M HUNGRY (even though we ate 10 minutes earlier), MOM SO AND SO HIT ME, BLAH, BLAH, BLAH......Yes it is fun being a mom, but not so much being a remodeler. I will post some pics tonight of the before of my room that way you can see all the progress I have made when I post the after pic. Guess I better get the baby before one of my sweeties tell me he is crying! :)

Thanks for the help!

Thanks for the emails and post on my blog in helping me to figure out how to post my tutorials on the side bar. As you can see I now have them labeled and posted on the side so hopefully as I continue to post my projects you will have quick access to the ones I make a tutorial for!
THANKS!!

Tuesday, July 21, 2009

Help with posting stuff on the side of my blog.

Does anyone out there know how to post stuff on the side of their blog. I would like to start posting tutorials and I would like to have them listed in their own category and not just under past posts. If you know and think you could explain it to someone who is computer challenged please email me @ brandigone@hotmail.com thanks!

Sunday, July 19, 2009

Grab 'n Go Tutorial

I totally made this pattern up so hopefully this tutorial is complete and you understand my instructions. Feel free to ask questions and I will answer them as quickly as possible. Can't wait to see what you all make.
Grab 'n Go Tutorial diaper and Wipe's Holder by yours truly!
Supply list:
velcro 2 fat quarters fusible fleece
bias tape or 2” by 36” of fabric 2 1/2” by 12” fabric for strap
ribbon, buttons, ric rac, etc... for trim


Cut you 2 fabrics and fusible fleece 12 1/2” by 18 1/4”. Iron the fusible fleece to the fabric that will be showing when you are finished.

Place your two fabrics with right sides facing each other. Sew along one short end. Open out and fold with wrong sides together and iron.


Round out the two top corners. This will be the end that you did not sew together. I used a ribbon spool to draw around.

Place a 2” piece of velcro (the soft side) 1 1/2” down from the top and centered. Pin in place and sew.

Fold the bottom up six inches and then sew around all the raw edges. Use a very small seam allowance this will only be to keep all the fabric in place while sewing on the bias tape.

OK for the next part you are going to make your own bias tape (except it's not true bias tape unless you cut your fabric on the bias) Anyways, that's ok I cheat all the time by not cutting on the bias. You are going to do this for the strap and binding. Take your fabric and fold it in half length wise and iron.


Open out and then fold each side to the center and iron.

Then fold in half and iron.

For the strap you are going to sew along the edge.

Fold strap in half and pin it to the side of your bag. Stitch strap in place.

You now need to put the other side of the velcro on the top of the bag. Make sure you don't sew it to close to the edge or it will be in the way of the bias tape.

If you are going to embellish your bag now would be the time to do it. Add ribbon, buttons, etc...

Now it's time to finish up. Pin the bias tape all the way around the bag and repeat how you started the bias tape at the beginning. Sew all around the bag making sure to catch the bias tape on both sides.


Here is what it should look like when you are done with the bias tape.

Next you are going to pull the strap out and sew it down so that it is facing the right direction.

Add a bow if you want and you are done!