
Candy Bouquet Tutorial
Supplies: (I purchased all of this stuff at the dollar store)
Mug or some sort of container to put the candy in
foam to fit the mug
shreddy stuff to cover the foam
curling ribbon
craft sticks
candy
hot glue gun

Take your craft sticks and put hot glue on the end of it. You will need to work pretty fast once you get the glue on your stick. Stick the candy onto the hot glue and hold it there for a second or two.
 Here is what it looks like all glued on.
 Do all your candy like this so that it will all be ready to go and you can just stick it into the foam.
 Put hot glue on your foam. **I realized you don't really need to use glue!
 Put the green stuff on the hot glue...which I am thinking you don't really need to glue down. The glue didn't want to stick to the green foam thingy very well. So, I will forget doing that next time. The candy being stuck into the foam should hold the green shreds in place.
 Start putting in your candy on sticks. I put the largest in the back and work my way forward.


 Just needs a few more pieces of candy down in front!
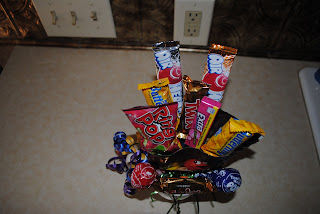
 Here it is all filled in...come on what gal wouldn't love to get a mug full of candy and they are bite size so that means they would work on anyone's diet! ;)
 Here it is all prettied up w/ some plain ole curling ribbon. When I do these for birthdays I use ribbon I also picked up at the dollar store that says Happy Birthday on it.
  Here is a top view...don't know why you would need that but, I took a picture of it so you are getting it whether you want it or not!
 Hope you all are inspired to go out there and make a super easy gift now!
 Stick the candy onto the hot glue and hold it there for a second or two.
 Here is what it looks like all glued on.
 Do all your candy like this so that it will all be ready to go and you can just stick it into the foam.
 Put hot glue on your foam. **I realized you don't really need to use glue!
 Put the green stuff on the hot glue...which I am thinking you don't really need to glue down. The glue didn't want to stick to the green foam thingy very well. So, I will forget doing that next time. The candy being stuck into the foam should hold the green shreds in place.
 Start putting in your candy on sticks. I put the largest in the back and work my way forward.

 Just needs a few more pieces of candy down in front!
 Here it is all filled in...come on what gal wouldn't love to get a mug full of candy and they are bite size so that means they would work on anyone's diet! ;)
 Here it is all prettied up w/ some plain ole curling ribbon. When I do these for birthdays I use ribbon I also picked up at the dollar store that says Happy Birthday on it.
  Here is a top view...don't know why you would need that but, I took a picture of it so you are getting it whether you want it or not!
 Hope you all are inspired to go out there and make a super easy gift now!
That is so cute! I love it. Thanks for posting something that a craft idiot like myself can actually do! I am going to use that.
ReplyDeleteSo glad you will be able to use it. It literally took like 5-10 minutes from start to finish and that was with taking pictures.
ReplyDelete